How an Angiogram Detects Blockages in Coronary Arteries
Introduction: When Your Blood Vessels Need a Close-Up
Imagine your body’s intricate network of blood vessels – arteries, veins, and capillaries – as a vast, complex highway system responsible for delivering life-sustaining oxygen and nutrients to every cell. Sometimes, traffic jams (blockages), potholes (aneurysms), or structural defects occur, disrupting this vital flow. To pinpoint these problems accurately and plan effective treatment, doctors often turn to a powerful diagnostic tool: the **angiogram**.
An angiogram, also known as an **angiography** or **arteriogram**, is a specialized medical imaging technique that provides a detailed, real-time roadmap of your blood vessels. It’s like turning on a high-definition spotlight inside your circulatory system, allowing physicians to see exactly where problems lie. Whether it’s unexplained chest pain suggesting heart disease, leg pain indicating peripheral artery disease, or symptoms pointing towards a brain aneurysm, an angiogram is often the gold standard for definitive diagnosis and guiding life-saving interventions.
This comprehensive guide delves deep into the world of angiograms. We’ll explore what they are, why they’re performed, the different types available, how to prepare, what happens step-by-step during the procedure, recovery, potential risks, alternatives, and answer common questions. By the end, you’ll have a thorough understanding of this crucial medical procedure, empowering you to navigate your healthcare journey with confidence.
Demystifying the Angiogram – What Exactly Is It?
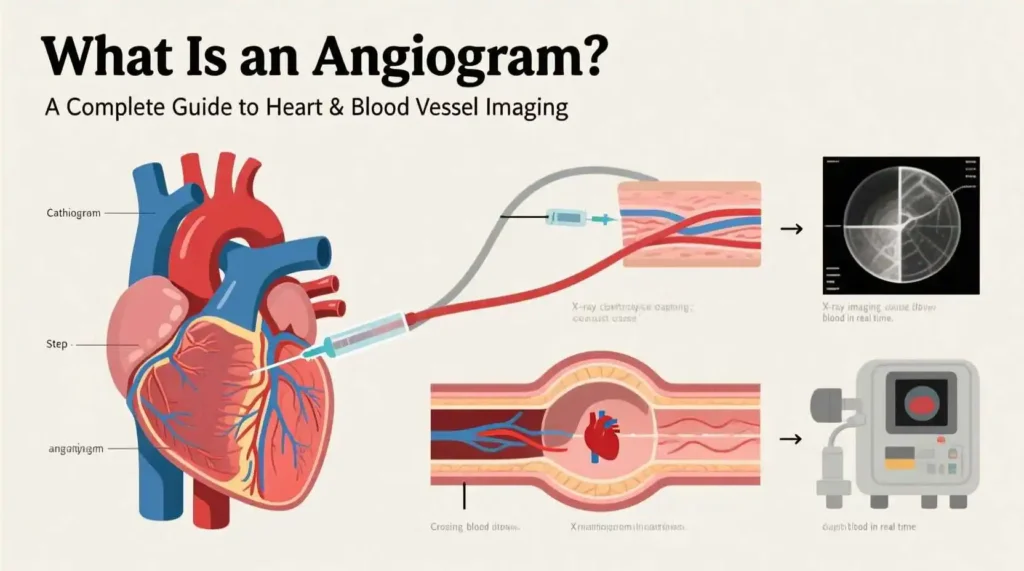
At its core, an angiogram is an **X-ray imaging technique** designed specifically to visualize the interior of blood vessels (lumen) and the organs they supply. Unlike a standard X-ray, which shows bones and dense tissues clearly but makes soft tissues and blood vessels appear faint or invisible, an angiogram uses a special contrast agent (dye) to make the blood vessels “light up” under X-ray.
Here’s the fundamental principle:
1. **Contrast Agent (Dye):** A special iodine-based liquid is injected directly into the bloodstream via a thin, flexible tube called a **catheter**. This dye is radiopaque, meaning it absorbs X-rays, preventing them from passing through. Wherever the dye flows, the blood vessels become distinctly visible on the X-ray images.
2. **X-ray Imaging:** As the dye circulates through the targeted blood vessels, a rapid series of X-ray images (fluoroscopy) are taken. Fluoroscopy provides a continuous, moving X-ray picture on a monitor, allowing the physician to watch the dye flow in real-time. This dynamic view is crucial for assessing blood flow, identifying blockages, and evaluating vessel function.
3. **Image Creation:** The X-ray images captured during the dye injection are processed, often using computer technology like Digital Subtraction Angiography (DSA), which digitally removes bones and other background tissues, leaving only the dye-filled blood vessels clearly visible. The result is a detailed map of the vascular anatomy.
Key Components Defined:
* **Catheter:** A long, thin, hollow tube made of flexible medical-grade plastic. It’s the conduit through which the dye is delivered and is carefully navigated to the precise location within the vascular system.
* **Contrast Agent (Dye):** Typically an iodine-based solution. While generally safe, it can cause allergic reactions in some individuals and requires kidney function assessment beforehand, as it is filtered out by the kidneys.
* **Fluoroscopy:** The real-time X-ray technology used to guide the catheter and visualize the dye flow during the procedure.
* **Digital Subtraction Angiography (DSA):** A computer-enhanced technique that takes a “mask” image (without dye) and subtracts it from images taken *with* dye. This eliminates overlapping bone and soft tissue shadows, providing incredibly clear, high-contrast images of just the blood vessels.
**Historical Context:** The foundations of angiography were laid in the late 1920s by Portuguese neurologist Egas Moniz, who developed cerebral angiography to visualize brain tumors and aneurysms. The technique evolved dramatically with the development of safer catheters by Sven-Ivar Seldinger in 1953 (the Seldinger technique, still widely used today), and the advent of fluoroscopy and digital imaging in the latter half of the 20th century, transforming it into the sophisticated, minimally invasive procedure it is now.
Why Do Doctors Order an Angiogram? Uncovering the Reasons
An angiogram isn’t a routine test; it’s typically ordered when non-invasive tests (like ECGs, stress tests, or ultrasounds) are inconclusive, or when a high suspicion of significant vascular disease exists that requires precise anatomical detail for diagnosis and treatment planning. Here are the primary reasons:
1. **Diagnosing Coronary Artery Disease (CAD):** This is the most common reason for an angiogram. When a patient experiences symptoms like:
* **Angina:** Chest pain, pressure, or discomfort, especially during exertion or stress.
* **Unstable Angina:** Sudden, worsening chest pain, even at rest.
* **Heart Attack (Myocardial Infarction):** An angiogram is often performed emergently during or after a heart attack to locate the blocked artery causing the damage and potentially open it immediately (angioplasty/stenting).
* **Abnormal Stress Test Results:** Indicating reduced blood flow to the heart muscle.
* **Heart Failure with Suspected CAD Cause:** To determine if blocked arteries are contributing to weakened heart function.
* **Valvular Heart Disease:** To assess the coronary arteries before valve surgery.
2. **Evaluating Peripheral Artery Disease (PAD):** When symptoms suggest blockages in arteries supplying the limbs, most commonly the legs:
* **Claudication:** Pain, cramping, or fatigue in the legs or buttocks during walking or exercise, relieved by rest.
* **Critical Limb Ischemia:** Severe pain at rest, non-healing sores or ulcers on the feet or legs, or gangrene, indicating very poor blood flow.
* **Pulse Abnormalities:** Weak or absent pulses in the legs or arms.
3. **Detecting Cerebrovascular Disease:** Issues affecting blood flow to the brain:
* **Stroke or Transient Ischemic Attack (TIA):** To identify blockages (thrombosis, embolism) or narrowing (stenosis) in the carotid or vertebral arteries supplying the brain.
* **Brain Aneurysms:** Weak, bulging spots on artery walls that risk rupture and life-threatening bleeding (subarachnoid hemorrhage).
* **Arteriovenous Malformations (AVMs):** Abnormal tangles of arteries and veins bypassing normal capillary circulation, which can bleed or cause seizures.
* **Vasculitis:** Inflammation of blood vessel walls
4. Assessing Other Vascular Conditions:
* **Aortic Aneurysms or Dissections:** Bulging or tearing in the body’s main artery (aorta), often in the chest (thoracic) or abdomen (abdominal aortic aneurysm – AAA).
* **Renal Artery Stenosis:** Narrowing of the arteries supplying the kidneys, which can cause high blood pressure (hypertension) or kidney failure.
* **Mesenteric Ischemia:** Blockages in arteries supplying the intestines, leading to severe abdominal pain after eating or weight loss.
* **Pulmonary Embolism:** Blood clots in the lungs (though CT Pulmonary Angiography is now more common for initial diagnosis).
* **Congenital Heart Defects:** Abnormalities in the heart’s structure or blood vessels present at birth.
* **Pre-Surgical Planning:** To map blood vessel anatomy before complex surgeries like tumor removal, organ transplantation, or vascular bypass grafting.
* **Evaluating Trauma:** To identify blood vessel injuries (lacerations, pseudoaneurysms, arteriovenous fistulas) after accidents.
* **Guiding Treatment:** Angiograms are not just diagnostic; they are often the first step in **endovascular interventions**. During the same procedure, if a blockage or aneurysm is found, the physician can immediately perform:
* **Angioplasty:** Inflating a small balloon at the tip of the catheter to widen a narrowed artery.
* **Stent Placement:** Inserting a small mesh tube to prop open an artery after angioplasty.
* **Embolization:** Deliberately blocking off blood vessels to stop bleeding (e.g., from an ulcer or trauma) or to cut off blood supply to tumors or AVMs.
* **Thrombolysis:** Delivering clot-busting drugs directly to dissolve a blood clot.
In essence, an angiogram provides the critical visual evidence needed to confirm a suspected vascular problem, understand its severity and location, and determine the most appropriate treatment strategy – whether it’s medication, minimally invasive endovascular therapy, or open surgery.
The Angiogram Family – Exploring Different Types
Not all angiograms are created equal. The specific type performed depends entirely on the area of the body being investigated. Here’s a breakdown of the main categories:
1. Coronary Angiography (Cardiac Catheterization):
* **Focus:** The coronary arteries (supplying the heart muscle itself) and the chambers of the heart.
* **How it’s Done:** The catheter is typically inserted into an artery in the groin (femoral artery) or wrist (radial artery) and carefully threaded up through the aorta to the openings of the coronary arteries. Dye is injected directly into each coronary artery and the left ventricle (main pumping chamber).
* **Primary Uses:** Diagnosing CAD, assessing severity of blockages, evaluating heart valve function, guiding angioplasty/stent placement, assessing post-heart attack damage.
2. Cerebral Angiography (Neuroangiography):
* **Focus:** The arteries and veins in the brain and neck (carotid and vertebral arteries).
* **How it’s Done:** Catheter inserted via femoral or radial artery, navigated up through the aortic arch and into the carotid or vertebral arteries. Dye injected to visualize the intracranial circulation.
* **Primary Uses:** Diagnosing aneurysms, AVMs, stenosis causing stroke/TIA, vasculitis, tumors affecting blood vessels, planning surgery or endovascular treatment (like coiling an aneurysm).
3. Peripheral Angiography:
* **Focus:** Arteries in the limbs (legs, arms) and sometimes the abdomen/pelvis (excluding the heart and brain).
* **Subtypes:**
* **Lower Extremity Angiography:** Evaluates arteries from the aorta down through the legs (aorto-iliac, femoral, popliteal, tibial arteries). Catheter usually femoral.
* **Upper Extremity Angiography:** Evaluates arteries in the arms and hands (subclavian, axillary, brachial, radial/ulnar arteries). Catheter can be femoral or brachial/radial.
* **Primary Uses:** Diagnosing PAD (claudication, critical limb ischemia), locating blockages for bypass or angioplasty/stenting, assessing vascular trauma, evaluating dialysis access (fistulas/grafts).
4. Pulmonary Angiography:
* **Focus:** The pulmonary arteries (carrying blood from the heart to the lungs).
* **How it’s Done:** Catheter inserted via femoral/brachial vein (approaching from the venous side), threaded through the right side of the heart and into the pulmonary artery. Dye injected.
* **Primary Uses:** Historically the gold standard for diagnosing pulmonary embolism (PE). Now largely replaced by CT Pulmonary Angiography (CTPA) due to its non-invasive nature, but still used if CTPA is inconclusive or contraindicated, or for guiding catheter-directed thrombolysis for large PEs.
5. Renal Angiography:
* **Focus:** The renal arteries (supplying the kidneys).
* **How it’s Done:** Catheter inserted via femoral artery, positioned in the abdominal aorta near the origins of the renal arteries. Dye injected selectively into each renal artery.
* **Primary Uses:** Diagnosing renal artery stenosis (a cause of hypertension and kidney failure), evaluating kidney tumors (especially before surgery or embolization), assessing renal transplant complications.
6. Aortography:
* **Focus:** The aorta (the body’s main artery).
* **How it’s Done:** Catheter positioned in the aorta (via femoral artery), dye injected.
* **Primary Uses:** Diagnosing aortic aneurysms (thoracic, abdominal), aortic dissection (tear in the aortic wall), aortic coarctation (congenital narrowing), assessing aortic trauma.
7. Visceral Angiography:
* **Focus:** Arteries supplying the abdominal organs (celiac axis – stomach/liver/spleen, superior mesenteric artery – intestines, inferior mesenteric artery – colon).
* **How it’s Done:** Catheter positioned in the abdominal aorta, then selectively advanced into the specific visceral artery branches.
* **Primary Uses:** Diagnosing mesenteric ischemia (intestinal angina), locating sources of gastrointestinal bleeding, evaluating tumors in the liver, pancreas, or kidneys, planning embolization for bleeding or tumors.
8. Digital Subtraction Angiography (DSA):
* **Not a separate type, but a technique:** As mentioned earlier, DSA is a computer processing method used *during* most conventional angiograms to enhance image quality by subtracting bone and soft tissue, leaving only the contrast-filled vessels visible. It’s the standard for nearly all catheter-based angiography today.
Important Distinction: Catheter-Based vs. Non-Invasive Angiography
The types described above primarily refer to **conventional (catheter-based) angiography**, which involves inserting a catheter into an artery or vein. However, the term “angiogram” is also sometimes used more broadly to include non-invasive or minimally invasive imaging techniques that visualize blood vessels:
* **Computed Tomography Angiography (CTA):** Uses IV contrast dye and rapid CT scanning to create detailed 3D images of blood vessels. Less invasive than catheter angiography (no catheter insertion, just an IV line), faster, and widely used for initial diagnosis (e.g., CTA for PE, coronary CTA, CTA for aortic dissection).
* **Magnetic Resonance Angiography (MRA):** Uses powerful magnets and radio waves (no ionizing radiation) to create images of blood vessels. Can be done with or without IV contrast (gadolinium-based). Excellent for evaluating the brain, neck, kidneys, and peripheral vessels without radiation, though less detailed than catheter angiography for small vessels or complex anatomy.
* **Doppler Ultrasound:** Uses sound waves to visualize blood flow and detect blockages or narrowing in arteries and veins. Completely non-invasive, no radiation or dye. Excellent for screening (e.g., carotid ultrasound, leg artery Doppler) but operator-dependent and less comprehensive for deep or complex anatomy than angiography.
Getting Ready – Preparing for Your Angiogram
Proper preparation is crucial for a safe and successful angiogram. Your healthcare team will provide detailed instructions, but here’s a general overview of what to expect:
1. Initial Consultation & Medical History:
* **Thorough Discussion:** Your doctor will explain *why* the angiogram is needed, the specific type planned, the potential benefits, risks, and alternatives. This is your chance to ask questions!
* **Detailed History:** Be prepared to discuss:
* All current medical conditions (especially kidney disease, diabetes, bleeding disorders, lung disease).
* All medications you take (prescription, over-the-counter, vitamins, herbal supplements). **Crucially:** Mention blood thinners (warfarin, clopidogrel/Plavix, apixaban/Eliquis, rivaroxaban/Xarelto, dabigatran/Pradaxa, aspirin) and diabetes medications (especially metformin).
* Allergies, especially to iodine, contrast dye, shellfish (though shellfish allergy doesn’t necessarily predict dye allergy, it’s noted), latex, or any medications.
* Previous reactions to contrast dye.
* Pregnancy or possibility of pregnancy (angiogram uses X-rays).
* Bleeding tendencies or if you bruise easily.
* Whether you have a pacemaker or implantable defibrillator (usually not an issue, but needs noting).
2. Pre-Procedure Testing:
* **Blood Tests:** Essential to check:
* **Kidney Function (Creatinine, BUN):** The contrast dye is filtered by the kidneys. Impaired function increases the risk of dye-induced kidney injury. Your doctor may need to adjust the dye type/volume or postpone the procedure if levels are too high.
* **Blood Count (CBC):** To check for anemia (low red blood cells) or clotting issues.
* **Coagulation Profile (PT/INR, PTT):** To assess how well your blood clots, especially if you’re on blood thinners.
* **Electrocardiogram (ECG/EKG):** To check your heart’s rhythm, especially for coronary angiograms.
* **Chest X-ray:** May be done to check your heart and lung size, particularly before coronary procedures.
3. Medication Management:
* **Blood Thinners:** This is critical. You will likely be instructed to **stop** taking certain blood thinners several days before the procedure to reduce bleeding risk at the catheter insertion site. **DO NOT STOP THESE ON YOUR OWN.** Your doctor will give specific instructions on when to stop and restart, balancing the risk of bleeding during the procedure against the risk of clotting without the medication.
* **Diabetes Medications:**
* **Metformin (Glucophage, etc.):** Usually stopped 24-48 hours before the procedure and not restarted for 48 hours *after*, to reduce the rare risk of lactic acidosis if kidney function is temporarily affected by the dye. Your doctor will give precise instructions.
* **Insulin and other diabetes meds:** Doses may need adjustment, especially if you’ll be fasting. Follow your doctor’s plan carefully.
* **Other Medications:** Continue taking most other medications (like blood pressure pills, thyroid meds) with a small sip of water on the morning of the procedure, unless specifically told otherwise. Bring a list of all your medications and doses to the hospital.
4. Fasting:
* You will be instructed not to eat or drink anything (**NPO – Nil Per Os**) for a specific period before the angiogram, typically **6-8 hours**. This is primarily for safety reasons related to sedation and to reduce the risk of aspiration (inhaling stomach contents). You can usually take essential medications with a tiny sip of water as approved by your doctor.
5. Arrangements:
* **Transportation:** **You will NOT be allowed to drive yourself home** after the procedure, even if you feel fine. Sedation and the procedure itself can impair your judgment and reflexes. Arrange for a responsible adult to drive you home and stay with you for the first 24 hours.
* **Time Off:** Plan to take at least the day of the procedure and the following day off work. Recovery time varies depending on the type of angiogram and whether any intervention was performed.
* **What to Bring:**
* Photo ID and insurance information.
* List of medications and allergies.
* Comfortable, loose-fitting clothing to wear home (avoid tight waistbands).
* Case for glasses/contact lenses, dentures.
* Any necessary medical devices (CPAP machine, inhaler).
* Leave valuables (jewelry, large amounts of cash) at home.
6. Hydration:
* Unless instructed otherwise (e.g., for heart failure), drink plenty of water in the 24 hours *before* the procedure (except during the fasting period). Good hydration helps your kidneys flush out the contrast dye afterward.
7. Skin Preparation:
* You may be asked to shower with a special antiseptic soap (like chlorhexidine) the night before or morning of the procedure to reduce bacteria on your skin. Avoid applying lotions, powders, or perfumes to the area where the catheter will be inserted (groin, wrist, arm).
8. Psychological Preparation:
* It’s normal to feel anxious. Talk to your doctor about your concerns. Understanding the procedure helps. Practice relaxation techniques (deep breathing, meditation). Bring a book or music for distraction while waiting. Remember, the team is highly experienced and focused on your safety and comfort.
Inside the Cath Lab – The Angiogram Procedure Step-by-Step
The angiogram is performed in a specialized room called a **Cardiac Catheterization Laboratory (Cath Lab)** or **Interventional Radiology Suite**. These rooms are equipped with advanced X-ray imaging equipment (fluoroscopy), monitors, and resuscitation equipment. Here’s a detailed walkthrough:
1. Arrival & Check-In:
* You’ll arrive at the hospital or outpatient center, usually a couple of hours before the scheduled procedure time.
* You’ll change into a hospital gown.
* A nurse will review your medical history, medications, allergies, and confirm you’ve followed fasting instructions.
* An IV line will be placed in your arm or hand. This is used to administer fluids, sedation, and medications during the procedure.
* You may be given a mild sedative (like midazolam/Versed) to help you relax. You will likely be drowsy but still able to follow simple instructions. General anesthesia is rarely needed for diagnostic angiograms but might be used for complex interventions or very anxious patients.
2. Monitoring Setup:
* You’ll be moved onto a padded X-ray table. This table can move in different directions and tilt.
* Several small sticky patches (electrodes) will be placed on your chest to monitor your heart rhythm (ECG) continuously.
* A blood pressure cuff will be placed on your arm.
* A small clip (pulse oximeter) will be placed on your finger to monitor your blood oxygen level.
* You might receive oxygen through a small tube under your nose.
3. Local Anesthesia:
* The area where the catheter will be inserted is cleaned thoroughly with antiseptic solution and draped with sterile towels.
* **Common Insertion Sites:**
* **Femoral Artery (Groin):** Historically the most common site, especially for complex procedures. The artery is located in the crease between your abdomen and thigh.
* **Radial Artery (Wrist):** Increasingly popular, especially for coronary angiograms. Offers advantages like easier patient mobility post-procedure and lower risk of bleeding complications. The artery is felt on the thumb side of your wrist.
* **Brachial Artery (Elbow/Arm):** Less common now, used if radial/femoral access isn’t suitable.
* A local anesthetic (like lidocaine) is injected into the skin and tissues around the chosen artery. You’ll feel a sharp sting or burn initially, but this quickly numbs the area. You should feel pressure but not significant pain during the rest of the procedure.
4. Catheter Insertion (The Seldinger Technique):
* A small incision is made in the skin at the insertion site.
* A hollow needle is carefully inserted into the artery. You might feel a brief “pop” as it enters.
* A flexible guidewire is threaded through the needle into the artery. The needle is then removed, leaving the wire in place.
* A short, hollow plastic tube called a **sheath** is threaded over the guidewire into the artery. The sheath acts as a stable port through which the catheter can be easily inserted and exchanged. The guidewire is removed.
* The sheath is secured to your skin with stitches or a special closure device.
5. Catheter Navigation:
* The long, thin angiogram catheter is inserted through the sheath into the artery.
* Using fluoroscopy (real-time X-ray) for guidance, the physician carefully manipulates the catheter through your arterial system towards the area of interest (e.g., heart for coronary, brain for cerebral, legs for peripheral).
* You won’t feel the catheter moving inside your arteries. The physician may ask you to take deep breaths or hold your breath briefly to get better images or move organs out of the way.
6. Contrast Injection & Imaging:
* Once the catheter tip is positioned precisely at the origin of the vessel(s) to be studied, the contrast dye is injected.
* **Sensation:** As the dye is injected, you will almost certainly feel a **warm, flushing sensation** spreading through your body. This is normal and usually lasts only 10-30 seconds. Some people describe it as a “hot flash” or feeling like they’ve wet themselves (you haven’t!). You might also experience a metallic taste in your mouth. These sensations pass quickly.
* **Image Capture:** As the dye flows through the blood vessels, the fluoroscopy machine rapidly takes a series of X-ray images from different angles. The physician watches these images live on monitors. You may hear whirring or clicking sounds from the machine as it moves around you. You’ll be asked to hold very still during the injections to ensure clear pictures.
* **Multiple Views:** The process of injecting dye and taking images is repeated for different vessels or from different angles to get a complete picture. For example, in a coronary angiogram, dye is injected into the left main coronary artery (and its branches) and the right coronary artery separately. Images are often taken in multiple projections (e.g., front view, side view, angled views).
7. Potential Interventions (If Planned):
* If the angiogram reveals a significant blockage or aneurysm that can be treated immediately, the physician may proceed with an endovascular intervention during the same procedure. This is common for coronary angiograms leading to angioplasty/stenting.
* **Angioplasty:** A small balloon at the tip of a special catheter is inflated at the site of the narrowing to compress plaque against the artery wall and widen the vessel.
* **Stent Placement:** A small, expandable metal mesh tube (stent) is mounted on a balloon catheter, positioned at the site of the blockage, and expanded into place when the balloon is inflated. The stent acts as a scaffold to keep the artery open. The balloon is deflated and removed, leaving the stent behind.
* **Other Interventions:** Embolization (blocking vessels), thrombolysis (dissolving clots), atherectomy (removing plaque) may also be performed if indicated.
* If an intervention is done, the procedure time will be longer, and additional dye injections and imaging will be performed to confirm the result.
8. Catheter and Sheath Removal:
* Once all necessary images and any interventions are completed, the catheter is withdrawn back through the sheath.
* **Removal Method:** How the sheath is removed depends on the access site and whether interventions were performed:
* **Manual Compression:** The most common method, especially for femoral access. Firm pressure is applied to the artery insertion site for 15-30 minutes (or longer if interventions were done) to allow the hole to seal and prevent bleeding. A sandbag or clamp may be placed over the site afterward.
* **Closure Device:** Special devices (e.g., Angio-Seal, StarClose, Perclose) can be used to seal the puncture hole in the artery mechanically or with a collagen plug. This allows for faster mobilization but isn’t suitable for everyone (e.g., very small or diseased arteries). The device is deployed through the sheath just before sheath removal.
* **Radial Artery:** A compression band (like a TR Band) is placed over the wrist site and inflated to apply pressure. It’s gradually deflated over several hours.
9. Immediate Post-Procedure:
* A small dressing or bandage is applied over the insertion site.
* You’ll be moved to a recovery area or observation unit.
* The IV line will remain for fluids and any needed medications.
* Nurses will closely monitor your vital signs (blood pressure, heart rate, oxygen), the insertion site for bleeding or swelling, and pulses in the affected limb.
* You’ll be encouraged to drink plenty of fluids to help flush the contrast dye from your kidneys.
**Duration:** A diagnostic angiogram typically takes **30 minutes to 2 hours**. If interventions like angioplasty/stenting are performed, it can take **1 to 3 hours or longer**.
The Road to Recovery – Aftercare and Beyond
